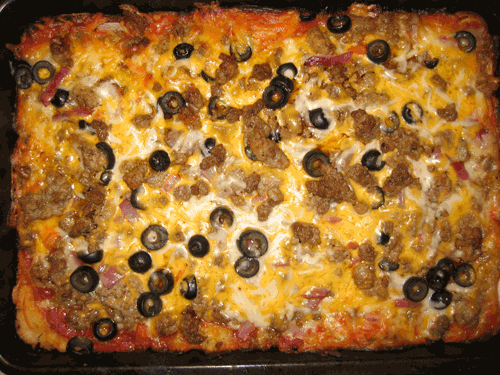
I haven’t had much time to post anything, but I’m starting to really make some progress on the pizza front and I wanted to share the recipe of this handmade gluten-free pizza that I’ve been stuffing myself with for the last month or so:

It wasn’t too hard for me to drop most gluten-containing foods or find substitutes, but pizza had always been a particular problem. Even when ready-made pizzas were available from the frozen food section or Tommy’s Pizza on Southside, they were typically pretty small compared to my appetite (and my budget!) I knew that if I was going to be able to afford to keep eating gluten free pizza, I was going to have to find a way to make it a lot cheaper. And while this isn’t quite rice and beans cheap, its quite affordable when you consider how many meals it can provide.
Now let’s get to the good stuff, something like that deep dish incarnation of the gluten-free pizza:
Ingredients
Gluten Free Pizza Crust
- 1.25 cups White sorghum flour
- .75 cups Whole grain brown rice flour
- .25 cups Corn starch
- 8 ounces Milk
- 1 tbsp Sugar
- 1 ounce (1 package) Dry yeast
- 2 tbsp distilled vinegar
- Garlic, pepper, oregano as preferred
- Oil for greasing the pan and hands
Gluten Free Pizza Sauce
- 16 oz (1 can) crushed or diced tomato
- 6 oz (1 can) tomato paste
- Oregano, garlic, pepper, salt, basil, and/or sage as preferred
Gluten Free Pizza Toppings
- 1/2 lb ground beef
- 1/2 lb ground sausage
- 1/3 onion
- 1/3 bell pepper
- 6 oz mild cheddar cheese
- 6 oz mozzarella cheese
- 1/2 small can olives
- 1/4 jar mushrooms
Ok, the first thing is to make sure you’ve got some space for everything. You’ll need a medium pot for warming up the sauce, and you’ll need a large frying pan to brown up all the beef and pork. The pizza dough is particularly space consuming: Its not just the large mixing bowl, but you’ll also need somewhere to roll it on additional flour. Once the dough is ready, you’ll also need a greased up surface to put it on – whether this is a brownie pan like my deep dish style, or a more professional pizza stone, or even right on a cookie sheet or square of tin foil.
Cooking the Pizza
Sauces and meats go first
Preheat the oven to 400 degrees…
Start the sauce up by pouring the crushed tomatoes and paste into the medium pot over low or medium heat. Stir in some oregano, garlic, basil, or pepper if you’re so inclined. Vinegar and pepper style hotsauce in the mix is also a great choice if you like a pizza with kick, but don’t let me or any other person tell you how pizza sauce should taste like. After a few attempts, you’ll know what needs to be tweaked for your own preferences.
When the sauce is stirred up and simmering, start up the beef and sausage on a bit higher heat. If you’re buying the really cheap ground meats, you’ll have to drain the pan a few times in this process. I don’t mind fat, but you should try to at least keep them dry enough so that they can brown a bit. So, every few minutes until the beef is completely cooked, continue to chop it up on the pan with like a plastic spatula. Basically, keep the pieces small and sort of dry.
What’s actually really important, is to not add any salt to the meats until they’re already cooked through. I read a very good experiment on this at Reddit and my own experiences confirm it – so you’ll have to trust me here or ask someone who saved it to post the link. Don’t forget though, no hotsauce on the beef & sausage until they’re already browned!
Making the pizza dough
Pour the 2 1/4 cups of flour and starch into a big mixing bowl. I usually also add in some fairly generous amounts of garlic, salt, (red) pepper, and oregano. Not a whole lot, but just enough to put some coloration and flavor in between the otherwise whitish flours.
Now pour a cup of milk (8oz) into a large coffee mug or something you can heat up in the microwave for a little bit less than a minute. When the milk is warm (not hot!), stir in the spoonful of sugar and the package of yeast. In a short while you’ll see some bubbles popping up and that is when you can add the milky mix and two tablespoons of distilled vinegar to your flour and spices mixture.
Stir this up as good as you can, making sure to pick up the flour at the bottom of the bowl often and get as much as you can into the ball of dough. If you let too much flour sit dry, the mix will be too slimy to work with, so the ratios are pretty important to keep constant here. Try to not spill or leave flour dry, it can be hard to try to add stuff later as compensation.
Now, you do need to put some dry flour on a dry non-stick surface (like a plate or aluminum foil). Don’t get this wet, and put it off to the side for now. A little later you’ll need this for the dough, and by that point your hands are going to be too greasy to work with dry flour.
At this point, you’re definitely going to get greasy. In fact, that’s the secret to this whole procedure. Before you touch that gooey mix of gluten free pizza dough, you need to literally coat your hands in some kind of cooking oil. Olive oil is too powerful of a flavor (and too expensive) so I’m using a much cheaper blend of various oils from SmartChoice right now. Basically, the cheapest big bottle that wasn’t pure canola.
In addition to your hands, you’ll also want to grease up a pan or pizza sheet. Drop a bit of oil right on to the cooking surface and use a napkin or paper towel to spread it around evenly. You don’t want any puddles to develop, but you do have to make sure that a complete layer is over the entire surface.
Now that your hands and pans are really greasy, you can finally pick up the pizza dough and start to play with it. Don’t grab it directly, but try to pour it out into your hand and lightly guide it into the shape of a ball. Whatever you do, don’t put a lot of force into it or let it sit on one part of your hands for too long! Move it around a bit, throw it from one hand to the other. Its not going to disc out like a glutenous pizza dough, but you can get a pretty good sphere going if you keep it moving.
Once you’ve got a dough ball, dust the exterior with some of that dry flour you set aside earlier. (I hope you remembered to do that before getting everything greasy!) Roll the dough over the dry flour – just enough to get a light inactive layer on the outside of the soon-to-be crust.
Now you’ve got a gluten free pizza crust you can really work with. Either lay it across the bottom of a brownie pan like I typically do, or just shape it around like a circle, or whatever. Just remember to pinch the dough at the edges a little bit and the yeast will take care of the rest of the rising effect.
Pizza Toppings
At this point in time the crust is ready, the sauce is cooked, and the beef & sausage mixture is probably smelling delicious. Because of this situation, the actual toppings that go on the pizza are as much a matter of patience as they are preference.
Chopping is a pain, but really small onions and peppers will really pay off in the taste experience. Its best to keep these under the cheese while cooking, so you can stir them into the sauce or put them on top immediately after you spoon the tomato sauce on to the crust. Mushrooms and olives are a bit more heat resistant, so they can be mixed in to the cheese or placed on top with the beef. Of course, if there is a lot of beef and sausage, you might need to put some of it under the cheese as well. Luckily, the deep dish pizza can tolerate a whole lot of delicious toppings!
Once you shape the dough, spoon the sauce on top, add the onions, peppers, cheese, mushrooms, beef, and/or olives (in that order), all that’s left to do is pop the pizza in to your preheated (400 degrees!) oven for about 30 or 35 minutes depending on depth.
Then:

Even though we didn’t stire any oil directly to the crust mixture, its still a pretty greasy and messy product when you consider the greasy hands and pans that held it! Yummm…
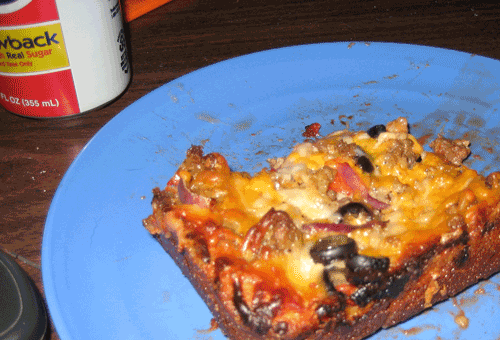
Of course, its absolutely delicious as well, and it delivers 10-12 slices like the one in the picture above. I wouldn’t call that a “light” meal, but its definitely pretty filling without going to the point of feeling overstuffed.
Price:
The flour is about $2.50, the meats are about $2.50, the veggies are another $2-3, and the sauce costs about $1.25. All together, this is a pretty big pizza for around $10.
Preparing a crust can take anywhere from five minutes to thirty – and it seems to get easier over time unless you’re trying to make different textures or make due with an imperfect selection of ingredients.
All together, the whole thing can be prepared in thirty minutes and cooked in another thirty. Once I realized that I was never more than one hour from a fresh pizza, I haven’t really been able to eat anything else…
Be warned… then eat up and enjoy!


