In the last few months there has been some progress – and some setbacks – in my attempts to make a convincingly real gluten-free pizza.

The basic gluten-free pizza recipe is pretty delicious, but there have been some modifications over time as well, in what I hope to be a process of improvement and refinement.

My first concern was that the crust was too brittle and prone to sticking to the pan.  It tasted fine, but the pizza often came up in broken chunks and had to be re-assembled on the plate.  Then eaten with a fork and knife!

Some of this is because the pizzas I’m making are just DEEP.  Its not quite a tomato pie here, but I do like to go a bit overboard on the sauce, the cheese, and the toppings. My girlfriend had to have some special cheese-free sections to try the pizza (I know, we’re a dietary disaster) and she was interested at first but she can’t take all of those canned tomatoes.  Hopefully in a few more weeks, our backyard garden will start to produce some yield and I’ll be able to try again with fresher produce.

So then I found that corn starch is effective for holding the crust together, but my friend Steve helped me out with some constructive criticism and announced quickly that it “tastes like a microwave pizza.”  And that’s probably a good observation, because I’ve found that those 99 cent microwave pizzas will use a lot of “food starch” without specifying the kind – since corn is just as cheap as or even cheaper than wheat they probably use quite a bit of it to keep their prices down.

When extra corn was ruled out as a solution I decided to try with the Xanthum gum.  Now I don’t know why gluten-free bakers swear by this stuff, but it has the capacity to make bread taste borderline terrible.  Its just gummy.  Who wants bread that tastes gummy?  Next!

Let it sit

So far, the best solution has been to let the dough sit for a much longer period of time.  Wow, that is actually tougher than it sounds.

Ok, so I let the dough sit on the counter (loosely covered) for about six hours, then I stuck it in the fridge and fell asleep.

When I woke up, it had a borderline awful stench of alcohol, but I added some more sugar to it just before rolling it in to my new cast iron pan.  To be safe, I added some sugar to the sauce too – it was going to be a pineapple pizza so the sweetness shouldn’t be a problem and I was honestly way more worried about the bitter alcohol smell coming from way too much fermentation.

But the actual taste and texture of the crust was greatly improved.  Ok, the taste was a good bit harsh, but I’m almost convinced that there’s a happy medium between rolling the dough out immediately and letting it sit for an entire day.  While this makes planning in to a small nightmare, I am pretty confident that the ideal gluten free pizza dough should have about three to four hours rising at room temperature or maybe twice that if chilling out in the fridge.

You might even be able to use more or less yeast to control the rate of reaction, but I really don’t know.   The best piece of advice you’ll ever get in the kitchen is to go ahead and try.  Whether you succeed or fail to produce something delicious, you’ll always be able to tell what there was too much or too little of for an improved attempt in the future.

Even though I’ve been enjoying home made gluten free pizzas for a few months now, I can’t say that I’ve really gotten the crust right except for one or two attempts.  Of course, when you’re really craving a pizza it is the taste that matters. if the crust crumbles & the meal requires a fork, well that’s just an inconvenient detail.

Baking with any kind of flour requires a lot of trial and error, but when you’re doing it gluten free the complication increases dramatically.  Gluten is definitely prized for its utility in making baked goods, so trying to make a non gluten version that still rises to a fluffy texture while not falling apart is an extra challenge.

In short, you’ll have to be patient.  This means: accept the inevitability of occasional failure; make sure to learn from those mistakes; and then still be willing to try new things and experiment with the recipe.

I haven’t had much time to post anything, but I’m starting to really make some progress on the pizza front and I wanted to share the recipe of this handmade gluten-free pizza that I’ve been stuffing myself with for the last month or so:

It wasn’t too hard for me to drop most gluten-containing foods or find substitutes, but pizza had always been a particular problem.  Even when ready-made pizzas were available from the frozen food section or Tommy’s Pizza on Southside, they were typically pretty small compared to my appetite (and my budget!)  I knew that if I was going to be able to afford to keep eating gluten free pizza, I was going to have to find a way to make it a lot cheaper.  And while this isn’t quite rice and beans cheap, its quite affordable when you consider how many meals it can provide.

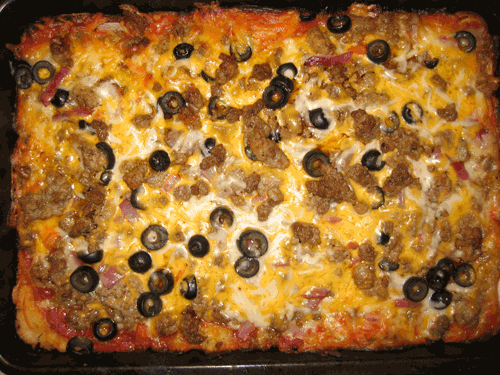
Now let’s get to the good stuff, something like that deep dish incarnation of the gluten-free pizza:

Ingredients

Gluten Free Pizza Crust

  • 1.25 cups White sorghum flour
  • .75 cups Whole grain brown rice flour
  • .25 cups Corn starch
  • 8 ounces Milk
  • 1 tbsp Sugar
  • 1 ounce (1 package) Dry yeast
  • 2 tbsp distilled vinegar
  • Garlic, pepper, oregano as preferred
  • Oil for greasing the pan and hands

Gluten Free Pizza Sauce

  • 16 oz (1 can) crushed or diced tomato
  • 6 oz (1 can) tomato paste
  • Oregano, garlic, pepper, salt, basil, and/or sage as preferred

Gluten Free Pizza Toppings

  • 1/2 lb ground beef
  • 1/2 lb ground sausage
  • 1/3 onion
  • 1/3 bell pepper
  • 6 oz mild cheddar cheese
  • 6 oz mozzarella cheese
  • 1/2 small can olives
  • 1/4 jar mushrooms

Ok, the first thing is to make sure you’ve got some space for everything.  You’ll need a medium pot for warming up the sauce, and you’ll need a large frying pan to brown up all the beef and pork.  The pizza dough is particularly space consuming:  Its not just the large mixing bowl, but you’ll also need somewhere to roll it on additional flour.  Once the dough is ready, you’ll also need a greased up surface to put it on – whether this is a brownie pan like my deep dish style, or a more professional pizza stone, or even right on a cookie sheet or square of tin foil.

Cooking the Pizza

Sauces and meats go first

Preheat the oven to 400 degrees…

Start the sauce up by pouring the crushed tomatoes and paste into the medium pot over low or medium heat.  Stir in some oregano, garlic, basil, or pepper if you’re so inclined.  Vinegar and pepper style hotsauce in the mix is also a great choice if you like a pizza with kick, but don’t let me or any other person tell you how pizza sauce should taste like.  After a few attempts, you’ll know what needs to be tweaked for your own preferences.

When the sauce is stirred up and simmering, start up the beef and sausage on a bit higher heat.  If you’re buying the really cheap ground meats, you’ll have to drain the pan a few times in this process.  I don’t mind fat, but you should try to at least keep them dry enough so that they can brown a bit. So, every few minutes until the beef is completely cooked, continue to chop it up on the pan with like a plastic spatula.  Basically, keep the pieces small and sort of dry.

What’s actually really important, is to not add any salt to the meats until they’re already cooked through.  I read a very good experiment on this at Reddit and my own experiences confirm it – so you’ll have to trust me here or ask someone who saved it to post the link.  Don’t forget though, no hotsauce on the beef & sausage until they’re already browned!

Making the pizza dough

Pour the 2 1/4 cups of flour and starch into a big mixing bowl.  I usually also add in some fairly generous amounts of garlic, salt, (red) pepper, and oregano.  Not a whole lot, but just enough to put some coloration and flavor in between the otherwise whitish flours.

Now pour a cup of milk (8oz) into a large coffee mug or something you can heat up in the microwave for a little bit less than a minute.  When the milk is warm (not hot!), stir in the spoonful of sugar and the package of yeast.  In a short while you’ll see some bubbles popping up and that is when you can add the milky mix and two tablespoons of distilled vinegar to your flour and spices mixture.

Stir this up as good as you can, making sure to pick up the flour at the bottom of the bowl often and get as much as you can into the ball of dough.  If you let too much flour sit dry, the mix will be too slimy to work with, so the ratios are pretty important to keep constant here.  Try to not spill or leave flour dry, it can be hard to try to add stuff later as compensation.

Now, you do need to put some dry flour on a dry non-stick surface (like a plate or aluminum foil).  Don’t get this wet, and put it off to the side for now.  A little later you’ll need this for the dough, and by that point your hands are going to be too greasy to work with dry flour.

At this point, you’re definitely going to get greasy.  In fact, that’s the secret to this whole procedure.  Before you touch that gooey mix of gluten free pizza dough, you need to literally coat your hands in some kind of cooking oil.  Olive oil is too powerful of a flavor (and too expensive) so I’m using a much cheaper blend of various oils from SmartChoice right now.  Basically, the cheapest big bottle that wasn’t pure canola.

In addition to your hands, you’ll also want to grease up a pan or pizza sheet.  Drop a bit of oil right on to the cooking surface and use a napkin or paper towel to spread it around evenly.  You don’t want any puddles to develop, but you do have to make sure that a complete layer is over the entire surface.

Now that your hands and pans are really greasy, you can finally pick up the pizza dough and start to play with it.  Don’t grab it directly, but try to pour it out into your hand and lightly guide it into the shape of a ball.  Whatever you do, don’t put a lot of force into it or let it sit on one part of your hands for too long!  Move it around a bit, throw it from one hand to the other.  Its not going to disc out like a glutenous pizza dough, but you can get a pretty good sphere going if you keep it moving.

Once you’ve got a dough ball, dust the exterior with some of that dry flour you set aside earlier.  (I hope you remembered to do that before getting everything greasy!)  Roll the dough over the dry flour – just enough to get a light inactive layer on the outside of the soon-to-be crust.

Now you’ve got a gluten free pizza crust you can really work with.  Either lay it across the bottom of a brownie pan like I typically do, or just shape it around like a circle, or whatever.  Just remember to pinch the dough at the edges a little bit and the yeast will take care of the rest of the rising effect.

Pizza Toppings

At this point in time the crust is ready, the sauce is cooked, and the beef & sausage mixture is probably smelling delicious.  Because of this situation, the actual toppings that go on the pizza are as much a matter of patience as they are preference.

Chopping is a pain, but really small onions and peppers will really pay off in the taste experience.  Its best to keep these under the cheese while cooking, so you can stir them into the sauce or put them on top immediately after you spoon the tomato sauce on to the crust.  Mushrooms and olives are a bit more heat resistant, so they can be mixed in to the cheese or placed on top with the beef.  Of course, if there is a lot of beef and sausage, you might need to put some of it under the cheese as well.  Luckily, the deep dish pizza can tolerate a whole lot of delicious toppings!

Once you shape the dough, spoon the sauce on top, add the onions, peppers, cheese, mushrooms, beef, and/or olives (in that order), all that’s left to do is pop the pizza in to your preheated (400 degrees!) oven for about 30 or 35 minutes depending on depth.

Then:

Even though we didn’t stire any oil directly to the crust mixture, its still a pretty greasy and messy product when you consider the greasy hands and pans that held it!  Yummm…

Of course, its absolutely delicious as well, and it delivers 10-12 slices like the one in the picture above.  I wouldn’t call that a “light” meal, but its definitely pretty filling without going to the point of feeling overstuffed.

Price:

The flour is about $2.50, the meats are about $2.50, the veggies are another $2-3, and the sauce costs about $1.25.  All together, this is a pretty big pizza for around $10.

Preparing a crust can take anywhere from five minutes to thirty – and it seems to get easier over time unless you’re trying to make different textures or make due with an imperfect selection of ingredients.

All together, the whole thing can be prepared in thirty minutes and cooked in another thirty.  Once I realized that I was never more than one hour from a fresh pizza, I haven’t really been able to eat anything else…

Be warned… then eat up and enjoy!

And its a lot more socially acceptable than most other amateur endeavors in chemistry..

I credit two things for my ability to cook.  First is my mom, who not only shared a wealth of Korean cooking methods, but also took specific effort to learn more common American meals so that she could integrate her knowledge.  Most of my cooking knowledge comes directly from her, but I can’t exactly help you learn more by suggesting you find a mom or dad who is great at cooking.  😉  If you are lucky enough to have a parent around who cooks well, be sure to take some time and spend it with them in the kitchen!  There’s a reason these traditions are worth carrying on – and that is that they taste delicious!  Oh yeah, there are probably some great emotional and sentimental reasons in there too, but I’m trying to stick to the food and the chemistry today.

The second great influence on my cooking is the few chemistry classes I’ve taken throughout the years, up to an undergraduate level.  Because really, when you break it down, the things you do in the kitchen aren’t all that different than what one might do in a chemistry lab.  Heat some liquid, stir some reagents, the ingredients themselves may not be identical but they do share some important characteristics.

For example, acids and bases mix to create water and salt. So if you’re adding acidic and basic ingredients to the same dish, extra salt might be just too much!

And speaking of salt, the reason why you add a pinch to a pot of water before boiling it is that because the extra ions of Na and Cl will allow the water to reach a higher heat before boiling.  So not only is the boiling point of water dependent on atmospheric temperature, its also a function of how many electrolytes are dissolved in the liquid!

Of course, oil and water don’t mix too well  – but they can both attach to fiberous plant pieces and create a consistent paste or thick soup.  Now remember, the smaller you cut up your veggies the more surface area they have.  And surface area is the primary factor in how many bonds a particular number of atoms can forge.

In fact, most organic compounds will partially dissolve in either water or oil (or both!) so we use oil to liquefy eggs (mayonaise) and we use water to extract delicious from coffee beans and tea leaves.  If something doesn’t want to dissolve in either of those and you insist on liquefying it, be sure to remember alcohol and acids like vinegar are needed.

And obviously, we can’t forget the chemistry of gluten that is at once desired for its ability to trap oxygen and rise to a fluffy bread and simultaneously reviled by those of us with an incompatible immune system.

Whether its the way heat transfers or how starches can be converted to sugar in the right heating conditions, there are a million little lessons we can learn from applying classroom chemistry to the household kitchen.  There are of course, other ways you can apply chemistry as a hobby.  But most of those involve explosions and toxic solvents that are kind of frowned upon in this age of security and paranoia!

04
Jan

So you want some stir fried vegetables but you don’t know what ingredients to start with? Maybe you got the veggies in mind, but end up with some dried out husks or a mushy paste? Read on brave souls, I’ll share the secrets of stir fry that I’ve learned this Christmas.

The first essential step is to pick what you’re working with. Generally, you’ll want a good bit of onions, some bell peppers (green and red if possible), some long green onions (aka scallion), some cracked black pepper, some garlic, and sesame oil.

That part is pretty much essential, but you can branch out further with squash, zucchini, peas, carrots, spinach, or anything you care for, really.

The trick is to keep the veggies most with the sesame oil and to cook them quickly at a high heat.

The other trick is the chronological order ingredients are added to the skillet. Vegetables should be added from those with the highest wetness, thickness, and density to those with the least.

This means you’ll probably start off with peas and carrots or peppers and onions in the pan, and you’ll add the scallion in last. When all the ingredients are equally mixed with the sesame seed oil, some cracked black pepper will really activate the flavors and give your stir fry a kick.

With just the various onions and peppers, this stir fry mix will complement any type of meats and rice. In future posts, I’ll try to add some popular variations of the stir fry basics, so stay tuned!